| Su | Mo | Tu | We | Th | Fr | Sa |
|---|---|---|---|---|---|---|
| 1 | 2 | 3 | 4 | 5 | 6 | |
| 7 | 8 | 9 | 10 | 11 | 12 | 13 |
| 14 | 15 | 16 | 17 | 18 | 19 | 20 |
| 21 | 22 | 23 | 24 | 25 | 26 | 27 |
| 28 | 29 | 30 | 31 |
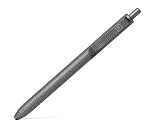
I bought a Big Idea Design Slim Click Pen. It is rather good! It is made of titanium - which is light and strong and it can accept a very wide range of ink cartridges. If you like pens - you will appreciate this pen.
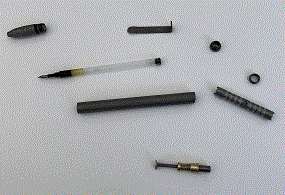
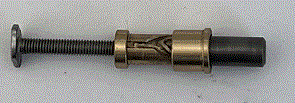
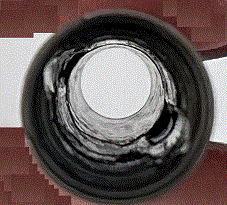
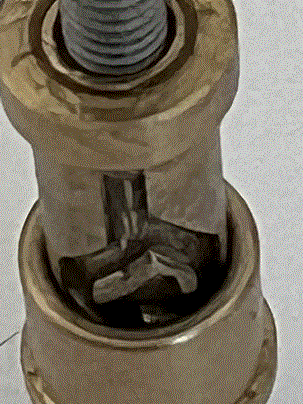
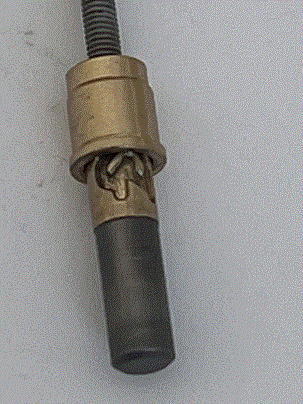
Here are some pictures of the pen and its internals, that show (basically) how it works.
 |
 |
 |
 |
 |
 |
Here is a simple DIY planner for 2024: 2024-DIY-Planner.pdf
If you have access to a printer that can print on both sides of a piece of paper, you can print yourself a letter sized 2024 planner using this file. You can then hole punch the pages and put the planner in a binder.
To create this, I used an awk program to write PostScript for the main planner and ps2pdf to convert the PostScript into a PDF. The initial calendar pages came from a combination of another awk program and the cal program.
And here is a shorter pdf which provides monthly spreads for 2024 planning, again for printing out double sided and hole punching to put in a binder: 2024-Monthly-Planner.pdf
Here is a simple DIY planner for 2023: 2023-DIY-Planner.pdf.
If you have access to a printer that can print on both sides of a piece of paper, you can print yourself a letter sized 2023 planner using this file. You can then hole punch the pages and put the planner in a binder.
To create this, I used an awk program to write PostScript for the main planner and ps2pdf to convert the PostScript into a PDF. The initial calendar pages came from a combination of another awk program and the cal program.
Here is a simple DIY planner for 2022: 2022-DIY-Planner.pdf.
If you have access to a printer that can print on both sides of a piece of paper, you can print yourself a letter sized 2022 planner using this file. You can then hole punch the pages and put the planner in a binder.
To create this, I used an awk program to write PostScript for the main planner and ps2pdf to convert the PostScript into a PDF. The initial calendar pages came from a combination of another awk program and the cal program.
Here is a 16 transistor 1 to 4 counter. It uses one astable multivibrator and two bistable multivibrators and four AND gates to do its counting. I found that it can also drive a red seven segment display I bought from Radio Shack a while back. It uses 5 volts, which it obtains from a 1.5 volt battery using a Joule thief-style voltage booster.
Or - using a regular link...
https://youtu.be/EQgVeVL2NHYThis does not have a practical application, of course! It was interesting to see how to do this using discrete components. Sketching the circuit diagram takes about the same length of time as soldering the components onto the board. I tested each part of the circuit using a breadboard prior to soldering it together.
As this uses one AA battery, and a boost circuit, its one use is doing something decorative, using largely depleted AA batteries. For this application it works well. There is a switch which increases the 'clock' frequency - so this interesting to try occasionally.
There are other nice applications of discrete transistor digital devices around. These have many more transistors!
http://www.megaprocessor.com (> 40,000 transistor computer!)
http://www.transistor-clock.com/ (194 transistor clock)
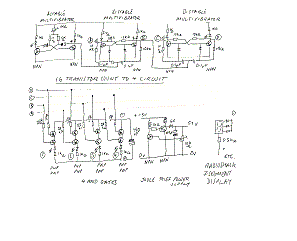 |
Although this is a simple circuit built from discrete components, it was nice to make, it shows how digital operations, like dividing by two, and checking whether two inputs are positive, can be carried out to achieve an objective.
I have been making more use of 'vi' to create documents containing written text recently. One problem with this is the lack of integrated spell checking in 'vi' - so I had a look for 'solutions' to this problem (or nice workarounds, at least). 'aspell' is straightforward to use - it does not do the highlighting that people have come to expect though. Checking around on this - I found that 'vi' has integrated spell check highlighting (nobody told me!).
Here is a simple .vimrc file that allows you to format a section of text '=', apply aspell to the entire file, switch on vi's spell checking, and turn on and off integrated 'vi' spell checking using the '+' and '-' keys (sometimes you do not want to have the highlighting of the spell check.
map = !}fmt -w 60 -d ''^M
map ^T :w!^M:!aspell check %^M:e! %^M
set spell
map + :setlocal spell^M
map - :setlocal nospell^M
Here the '^' symbol indicates a character sequence that begins with 'control-v' followed by the control character that you want to enter - e.g. 'enter' or 'control-t'. So ^T is entered as 'control-v control-t' and ^M as control-v enter'.
When you have these lines in your ~/.vimrc file, the following functions are enabled in vi.
'=' will run the 'fmt' program on the current paragraph and format this text at a width of 60 characters
'control-t' will run aspell on the current file. Aspell will take you through possible miss-spellings and allow you to correct them or accept corrected spellings.
'+' turns on interactive spell checking as is now built into vi.
'-' turns off interactive spell checking as is now built into vi.
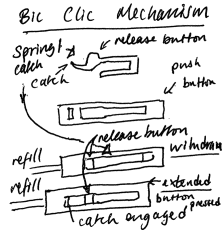
Bic created their own unique retraction system for pens. This uses a plastic latch which stops the push button from springing open when the pen is in use.
Here is a picture of the internals of a Bic BU2 Grip pen - showing the two plastic parts that make up the button and latch. The refill has a spring that pushes on the button and allows the latch to operate.
 |
I believe that the same mechanism is used in the classic Bic M10 Clic type ballpoint pens. You can extract the push button and latch by pressing the protruding part of the latch into the body of the pen. If you push far enough the button will come free from the pen body. To reassemble the pen, put the latch into the correct position inside the push button, and push it into the pen until it engages with the slot in the pen body.
The sketch shows how the latch uperates.
 |
What is nice about the Bic mechanism is that it relies on the springiness of plastic!
Here is a simple DIY planner for 2021: 2021-DIY-Planner.pdf.
If you have access to a printer that can print on both sides of a piece of paper, you can print yourself a letter sized, two pages per week, 2021 planner using this file. You can then hole punch the pages and put the planner in a binder.
To create this, I used an awk program to write PostScript for the main planner and ps2pdf to convert the PostScript into a PDF. The initial calendar pages came from a combination of another awk program and the cal program.
For some reason I became interested in the mechanisms of ballpoint pens recently. This is partly because the push button action of a ballpoint pen essentially divides by two. Two downward 'pulses' on a pens button result in one downward press of the ballpoint pen refill. If you were to connect ballpoint pens (with the appropriate levers) you could divide mechanical 'pulses' by any desired number of twos. This would enable you to count using mechanical counter.
I made an electronic divide by two device using bistable multivibrators - I will do a short article on that at some stage. It is interesting to observe that a mechanical version of this circuit could be constructed. The mechanical version would not be able to operate at a high frequency, of course.
I am also interested in ballpoint mechanisms because they can be diverse. The ratchet style mechanism seems to have one in the evolution of the ballpoint pen. Here (below) is a diagram of how the ratchet ballpoint mechanism works. The parts are actually cylindrical but they are easier to draw and understand in a 'flattened' view. So, the diagram is stylized and not to scale. The pen works by having a set of teeth at the top of the refill that can slip into either deep or shallow grooves. Then the teeth fit into shallow grooves the pen is extended, when the teeth fit into the deep grooves the pen is retracted. The push button pushes the teeth out of all grooves and moves the teeth around so that they will be pushed into the opposite type of groove that they were formerly in.
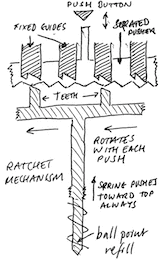 |
The ratchet ballpoint mechanism only requires a refill, a spring, a set of teeth, a pusher, and the grooves; and no real assembly, except dropping the parts into the pen body in the correct order.
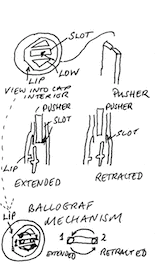
Another type of ballpoint mechanism was invented by Ballograf. The diagram below tries to show how this works. (And possibly it is better described in the patent GB851060). The Ballograf mechanism is rather different to the ratchet mechanism, it uses a little brass piece to 'record' the state of the pen. The position of the brass piece is moved with a flat blade to be in one of two positions in a slot. When the pusher is forced into the slot, the brass piece is moved into a particular side area (because the pusher has beveled edges). At one end of the slot, the brass piece catches its 'waist' on a lip. In this position the pen is extended. When the pen's button is pushed again, the brass piece is moved to the other end of the slot, where there is no lip, and the pen is retracted. The resulting clicking mechanism for the Ballograf is different to the ratchet mechanism but works very well in practice. (I really like my Ballograf Epoca!).
Billions of ballpoint pens have been manufactured and sold. The Bic crystal ballpen (which has no mechanism) has sold at least 100 billion units. So ballpoint pens have probably sold trillions overall. These huge numbers make intuitive sense. For example, if you imagine that for the last decade every person has used something like 10 ballpoint pens per year, and there are 7 billion people around, then in 10 years, it is easy to see that 700 billion ballpoint pens have been manufactured, sold, bought, and used. Of course some people do not write much, but others (like school children) use and lose many more than 10 pens per year.
Quite possibly the rate of production of ballpoint pens will slow now that many things are digital. Ballpoint pens made writing in ink cheap and accessible to everyone, they were an extraordinary invention in the twentieth century. Lots of innovation and mass production was involved, and the price of writing became more and more reasonable, which is the way that things should progress.
 |
There is a fantastic movie on YouTube showing how the Ballograf Epoca is manufactured (in Sweden, still, I believe). From the video you can see that the skill in making the pen is now encoded in clever robotic machines that automate the production process. Nevertheless, the mechanism behind the ballpoint pen is brilliant too!
(the second link features music from the band Television at the beginning - you cannot beat that!)
 |
Here is a simple DIY planner for 2020: 2020-DIY-Planner.pdf.
If you have access to a printer that can print on both sides of a piece of paper, you can print yourself a letter sized, two pages per week, 2020 planner using this file. You can then hole punch the pages and put the planner in a binder.
To create this, I used an awk program to write PostScript for the main planner and ps2pdf to convert the PostScript into a PDF. The initial calendar pages came from a combination of Excel and the cal program.